# Set up SCIM with Microsoft Entra ID
Connect Microsoft Entra ID to a Shortcut Workspace and manage user provisioning, roles, deactivation, and Teams.
Use Microsoft Entra ID to create, update, deactivate, and reactivate users in a Shortcut Workspace. You can also map Shortcut workspace roles and sync Entra groups to Shortcut Teams.
## Before you begin
- Use a Shortcut Enterprise plan or a Business plan with the SSO add-on. You need Owner or Admin access in Shortcut and permission to manage the enterprise application in Microsoft Entra.
- Configure [SAML SSO](/help/admin/saml-sso-single-sign-on) for your Shortcut Organization. SSO can remain optional. Set the destination Workspace to invitation-only under **Settings > Invite New User > Settings**.
- Ask [Shortcut Support](mailto:support@shortcut.com) to enable SCIM and issue a **Tenant URL** and **Secret Token** for the Workspace. Use the full URL Support provides. The token is specific to that Workspace.
SAML applies to the Organization and SCIM applies to the Workspace. Create a separate provisioning app for each Workspace and keep it separate from your Shortcut SAML sign-in app. Users who sign in through Entra SAML also need access to the SAML app.
## 1. Create and connect the provisioning app
1. In the [Microsoft Entra admin center](https://entra.microsoft.com/), go to **Enterprise applications > New application > Create your own application**.
2. Name it for the destination Workspace, choose **Integrate any other application you don't find in the gallery (Non-gallery)**, and select **Create**.
3. Open the new app and select **Provisioning > New configuration**. If you see **Get started**, select it and set **Provisioning Mode** to **Automatic**.
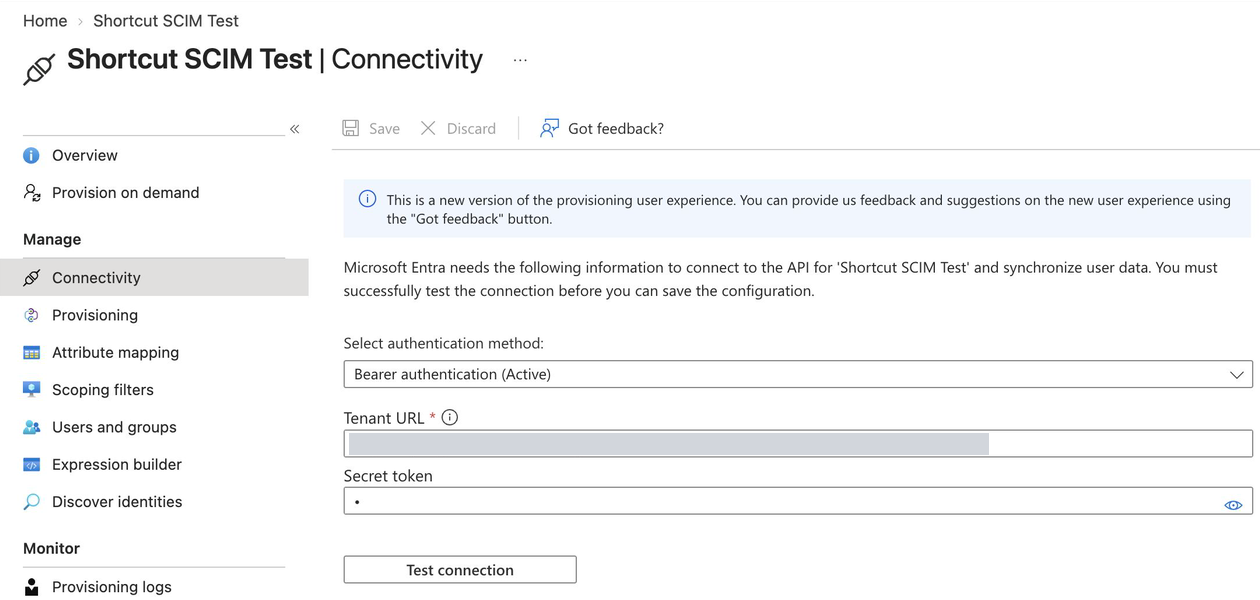
4. Use **Bearer authentication**. Enter the **Tenant URL** and **Secret Token** from Shortcut Support under **Connectivity** or **Admin Credentials**, depending on the Entra view.
5. Select **Test connection**. After it succeeds, select **Create** for a new configuration or **Save** when editing one.
## 2. Map user attributes
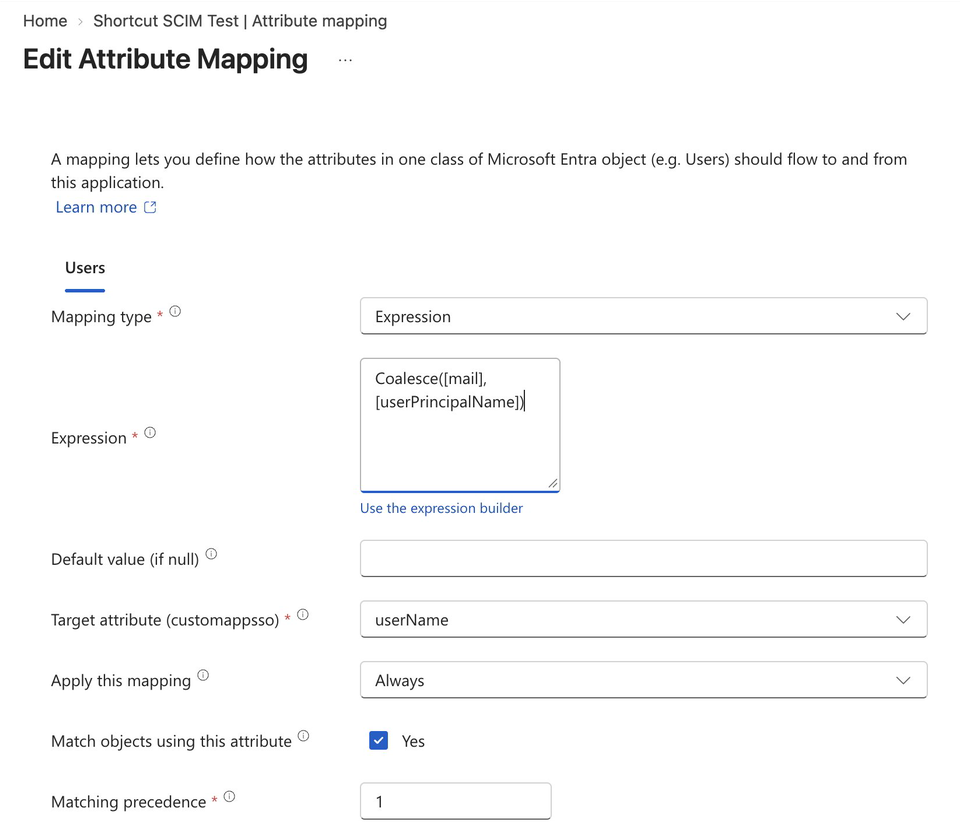
Open **Provisioning > Attribute mapping > Users**. In the legacy view, expand **Mappings** and select **Provision Microsoft Entra ID Users**. Edit the existing rows for these targets so each target has one mapping.
| Entra source or expression | SCIM target | Mapping type |
| --- | --- | --- |
| `Coalesce([mail],[userPrincipalName])` | `userName` | Expression. Enable **Match objects using this attribute** and set matching precedence to **1**. |
| `Coalesce([mail],[userPrincipalName])` | `emails[type eq "work"].value` | Expression |
| `displayName` | `displayName` | Direct |
| `objectId` | `externalId` | Direct |
| `Switch([IsSoftDeleted], , "False", "True", "True", "False")` | `active` | Expression. Keep Entra's default. |
Shortcut matches users by email. Map `userName` and work email from the same expression so the values agree, including for users without a `mail` value. Use `userName` as the matching attribute. Shortcut ignores extra attributes such as addresses and phone numbers that the default Entra configuration may send.
Under **Target Object Actions**, select **Create** and **Update** and clear **Delete**. If the actions are hidden, switch to the legacy mapping view. Shortcut deactivates workspace access through updates to `active`, so leave that mapping in place. Save your changes. Entra may restart the provisioning job when you save mapping changes.
### Optional role mapping
New users are Members when you omit the role mapping. Updates without a role keep the user's existing role.
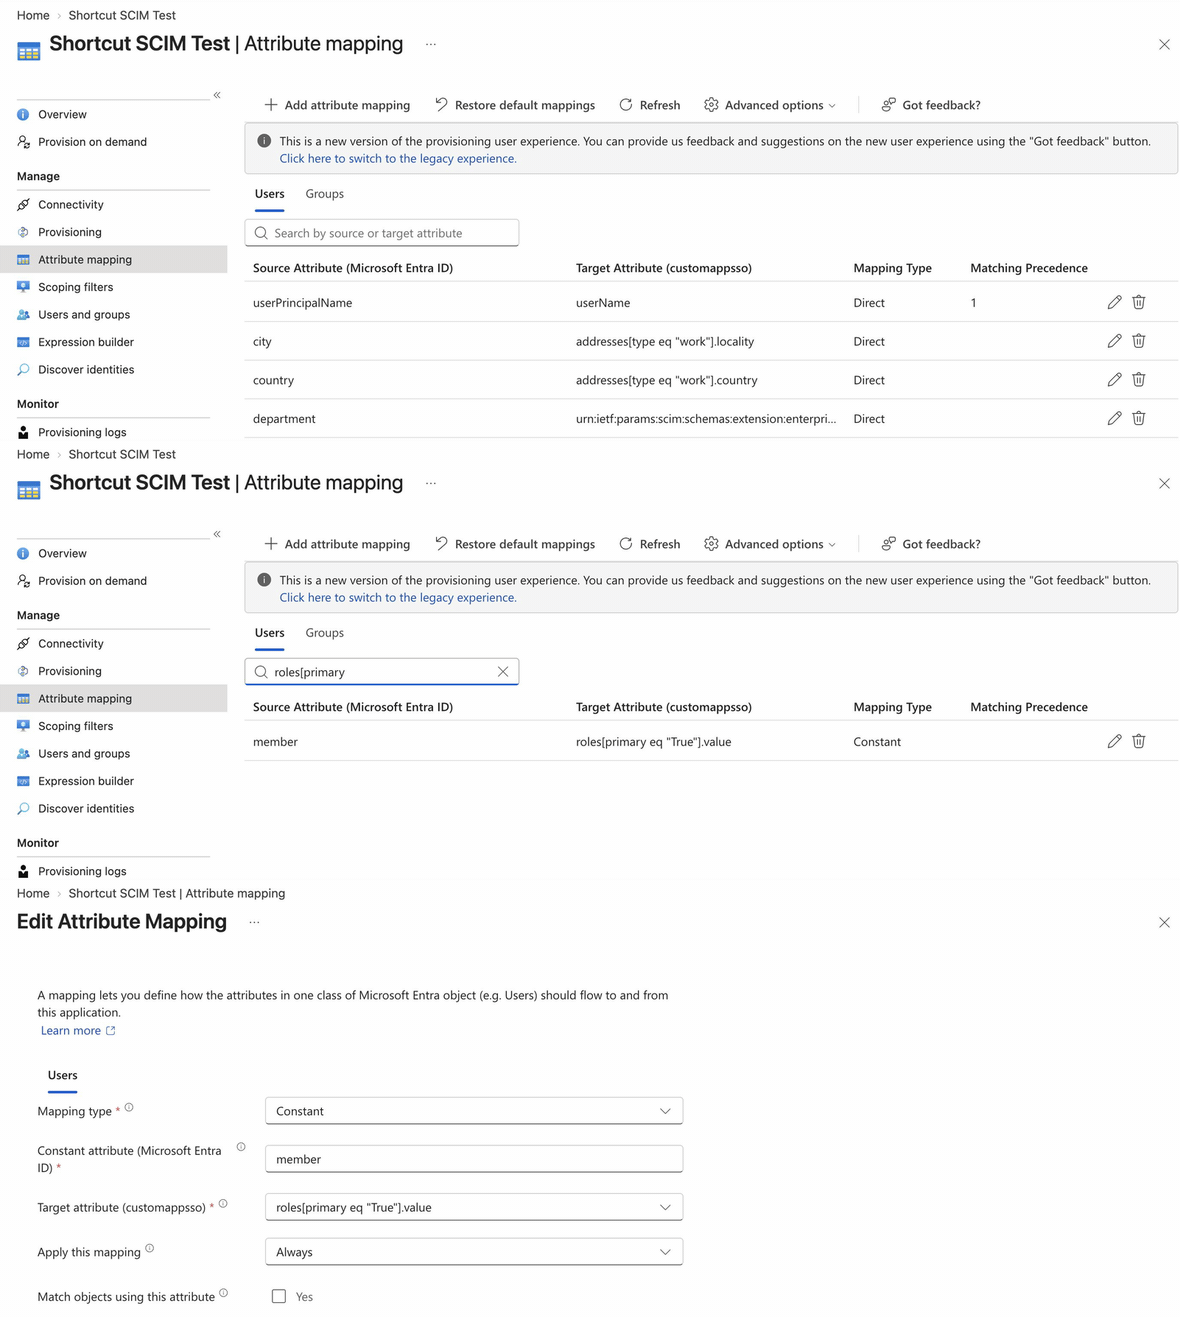
To manage roles from Entra, add a constant or an expression targeting `roles[primary eq "True"].value`. Use the lowercase values `observer`, `member`, or `admin`. Set **Apply this mapping** to **Always** to sync changes for existing users. A constant applies to every user in scope, so choose it with the full assignment list in mind.
For an expression, use an attribute your administrators control that is available in your provisioning source. For example, if `extensionAttribute1` holds the intended Shortcut role, this expression sends only the three supported values and skips the role for any other value:
```
IgnoreFlowIfNullOrEmpty(Switch([extensionAttribute1], "", "admin", "admin", "member", "member", "observer", "observer"))
```
Test each value you plan to use before rollout.
SCIM shows a workspace Owner as `admin`. Sending `admin` keeps the Owner role, but sending `member` or `observer` changes it. A constant `member` mapping set to **Always** demotes any Owner assigned to the app, so make sure your mapping sends `admin` for Owners.
With **Always** selected, a role changed directly in Shortcut can be overwritten the next time Entra exports a role for that user, including after a mapping change or a provisioning restart. Manage ongoing role changes in Entra when you use this setting.
Use the standard `roles` target for Entra. If you're updating a configuration that also maps the legacy `role` target, remove that mapping. Shortcut gives `role` precedence when both attributes are sent together. Assigning an enterprise app's Entra role and setting a Shortcut role through SCIM are separate settings. [Microsoft's mapping reference](https://learn.microsoft.com/en-us/entra/identity/app-provisioning/customize-application-attributes)
Watch how to find and review the role mapping
## 3. Assign and provision a test user
1. Under **Provisioning > Settings**, set **Scope** to **Sync only assigned users and groups** and save.
2. In **Users and groups**, select **Add user/group**, select a test user, and select **Assign**.
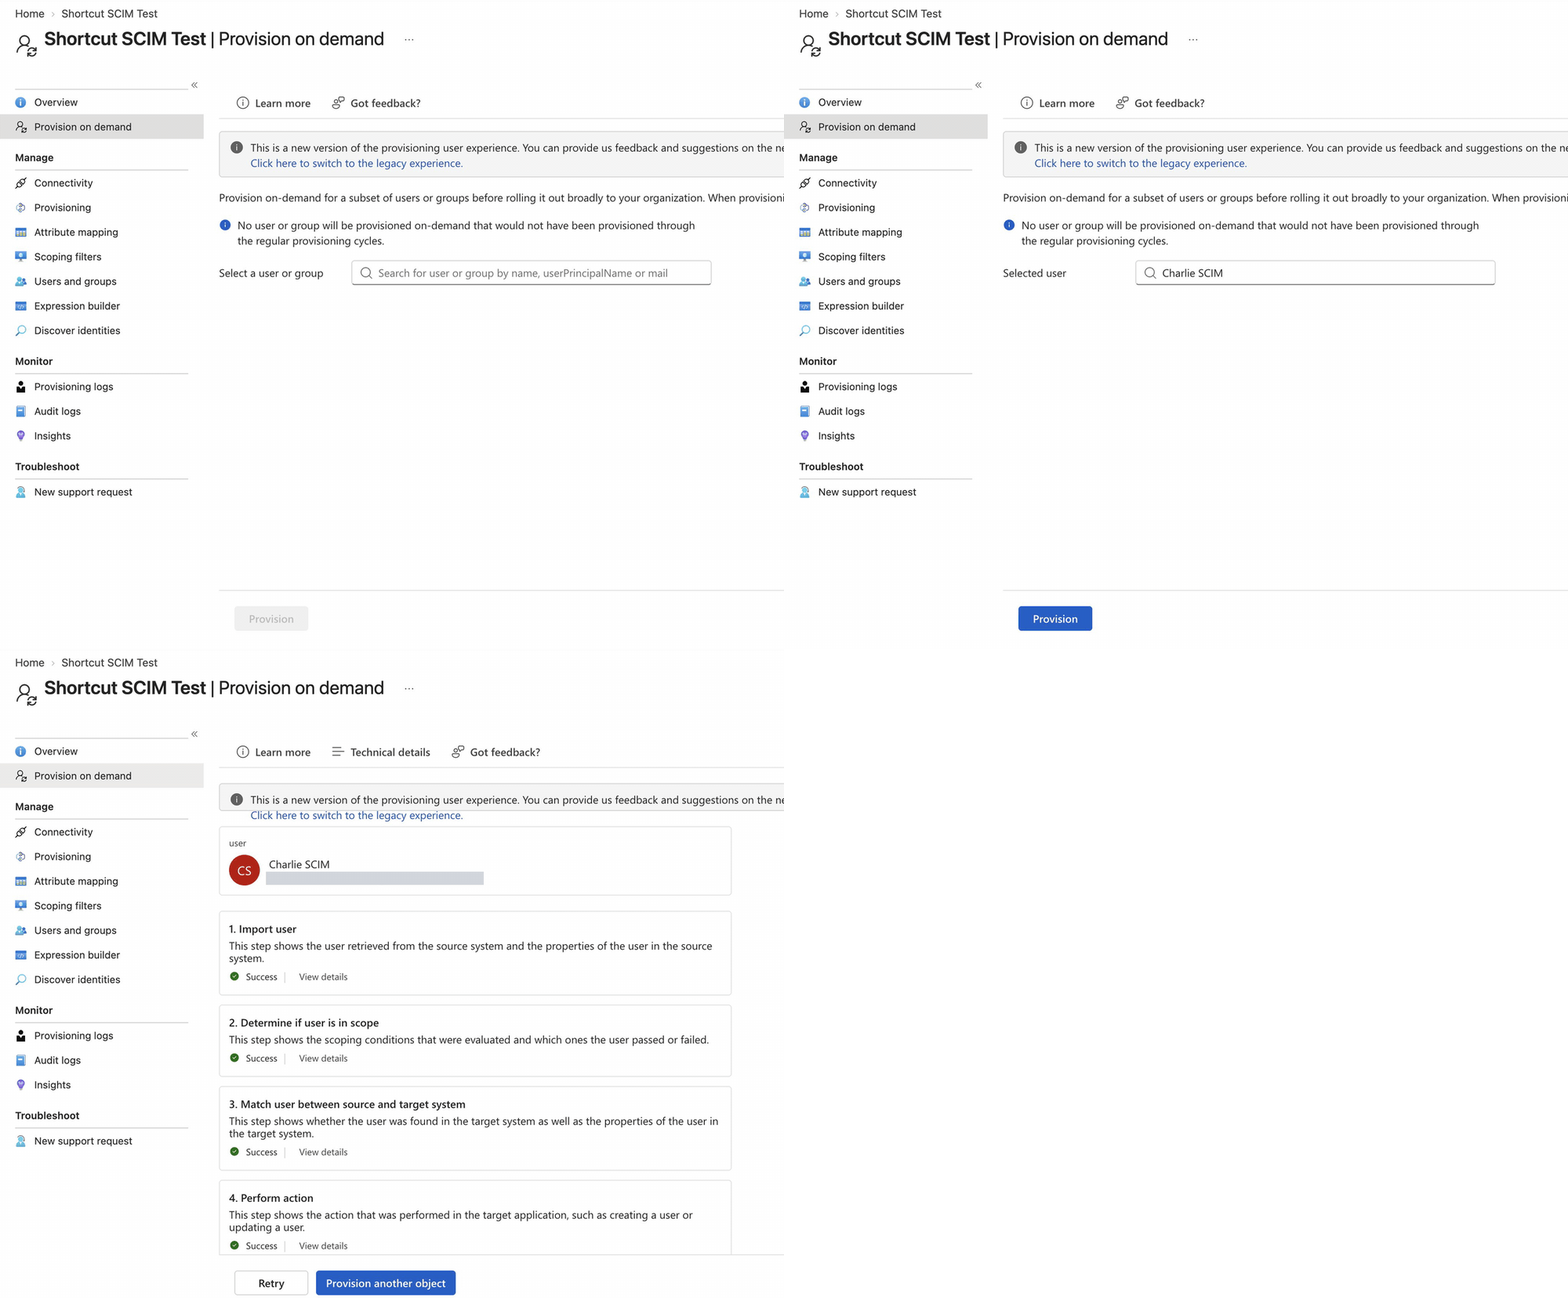
3. Open **Provision on demand**, search for the test user, select them, and choose **Provision**.
4. Expand the result for **Perform action** to see whether Entra created or updated the user and what values it sent. Verify the user and role in [Shortcut User Management](/help/admin/user-management). If your Organization already has a Shortcut user with the same email, check that Entra links to the existing user.
5. If the user is skipped immediately after assignment, verify the assignment, wait a few minutes, and retry. Microsoft documents a replication delay of up to a few minutes before on-demand provisioning recognizes a new assignment. If you recently edited a mapped value, check the imported value before retrying.
Watch an on-demand provisioning run
When the test passes, assign the remaining users. Select **Start provisioning** on the provisioning **Overview** page, or set **Provisioning Status** to **On** and save in the legacy view. Use **Provisioning logs** to monitor the rollout. Microsoft documents an initial cycle followed by incremental syncs about every 40 minutes. [Microsoft's SCIM setup guide](https://learn.microsoft.com/en-us/entra/identity/app-provisioning/use-scim-to-provision-users-and-groups)
## Manage users and roles
| What you want to do | What to change in Entra |
| --- | --- |
| Add someone to the Workspace | Assign them to the provisioning app and let the next cycle run, or use **Provision on demand**. |
| Change a mapped name, email, or role | Update the mapped source or role expression. Verify the export and the resulting values in Shortcut. |
| Deactivate workspace access | Remove the user's assignment to the provisioning app or disable their Entra account. Entra sends an `active` update and Shortcut keeps the existing record. If access was assigned through a group, check whether another app assignment still puts the user in scope. |
| Restore workspace access | Restore the assignment or re-enable the account in Entra, then verify that Shortcut shows the existing workspace user as active. If the user still cannot sign in, check their SAML app assignment and contact Shortcut Support if their Shortcut account remains disabled. |
For an individual unassignment, you can use on-demand provisioning to test deactivation. For accounts disabled or deleted in the Entra directory, use the scheduled cycle because those accounts are unavailable in the on-demand picker. Verify the result in **Provisioning logs** and in Shortcut. [Microsoft's on-demand provisioning guide](https://learn.microsoft.com/en-us/entra/identity/app-provisioning/provision-on-demand)
Deactivating workspace access removes the user from all Teams in that Workspace, and restoring access doesn't add them back. After you restore a user, check their Team memberships. If you use group provisioning, verify that Entra has reapplied the expected memberships.
To pause scheduled syncing, select **Pause provisioning** from **Overview**, or set **Provisioning Status** to **Off** and save in the legacy view. A cycle that is already running can continue to completion. Resume the job when you're ready for Entra to sync assignments and updates again.
## Optional group provisioning for Shortcut Teams
Group-based app assignment requires Microsoft Entra ID P1 or P2. Entra provisions direct group members. [Microsoft's app assignment guide](https://learn.microsoft.com/en-us/entra/identity/enterprise-apps/assign-user-or-group-access-portal)
1. Open **Provisioning > Attribute mapping > Groups**, or **Provision Microsoft Entra ID Groups** in the legacy view, and enable the group mapping.
2. Map `displayName` to `displayName` and set matching precedence to **1**. Map `objectId` to `externalId` and `members` to `members`. Keep **Create** and **Update** selected and clear **Delete**.
3. In **Users and groups**, assign the Entra group to the provisioning app. Use **Provision on demand** to test the group with up to five selected members, or wait for a scheduled cycle. Review the result, then check the Team and its membership in Shortcut.
Shortcut matches a Team by name or creates it with the Workspace's default workflow. Group names must be 63 characters or fewer. Once linked, group renames and direct membership changes sync to the Team. Users deactivated through SCIM are removed from their Teams.
With **Delete** cleared, Entra doesn't send a SCIM group delete, so removing the group in Entra doesn't archive its Team. Archive the Team in Shortcut if needed and check its remaining members.
## Troubleshoot provisioning
| What you see | What to check |
| --- | --- |
| Connection test fails | Check that the complete Tenant URL and the current Secret Token are for the same Workspace. Contact Shortcut Support if you need a replacement token. |
| User is skipped | Check the app assignment, provisioning scope, and the result under **Determine if user is in scope**. Newly assigned users can take time to appear in scope. |
| Username and primary email are inconsistent | Verify that both mappings use the same expression and export the same address. |
| `invalidValue` or the wrong role | Check the exported value, the standard role target, and whether a legacy `role` mapping is also present. |
| "Email already in use" (`uniqueness`) | Check the exported email and whether another Shortcut account already uses it, including an account outside your Organization. Contact Shortcut Support to resolve the conflict. |
| User is provisioned but can't sign in | Check that the user can sign in through your Shortcut SAML app if SAML applies to them and that their workspace access is active. |
See the [SCIM overview](/help/admin/scim) for supported attributes and additional errors.