Overview
If you’re switching from a tool like Linear, ClickUp, Pivotal Tracker, Monday.com, or Zenhub, or if you need to recreate existing Story data in another Shortcut Workspace, you can import that work using our CSV import tool.
Initiate Import Request
The import process is assisted by our Support team. Follow these steps inside Shortcut:
- Navigate to Settings
- Click Import / Sync under Workspace Settings
- Select which tool you are coming from to access the CSV Import Guide and CSV template
- Follow the instructions in the file to complete the data entry
- Once finished, download the “Import Template” sheet as a CSV and send that file to support@shortcut.com to import
Multiple imports can be performed if needed.
Importing from Jira Server
Follow the Import Request flow above to begin the process, then export the issues from your Jira Server instance:
- Navigate to All Issues
- Filter to the Issues you would like to import
- Select Export > CSV All Fields
- Use the CSV template provided in the UI to properly format your file for import
CSV Template Formatting
After you’ve exported your data as CSV from your existing tool, ensure that the data columns match Shortcut’s expected format:
| Field | Content | Notes |
|---|---|---|
| name | Title of the Story | Required. 5,000 character limit |
| id | External ID reference | Numerical values only |
| state | Current workflow state | Required. Maps to existing Shortcut state |
| type | Story type | feature, bug, or chore only. Others default to feature |
| requester | Person who requested the Story | Email, Name, or username. Can be mapped to existing users |
| owners | User(s) who own the Story | Email, Name, or username |
| description | Story description content | 20,000 character limit. Supports Markdown and light HTML |
| labels | Tags for the Story | Separate multiple labels by semicolon: Label A;Label B;Label C |
| external_tickets | Linked URLs | Example: https://shortcut.com |
| created_at | Date Story was created | Format: yyyy/MM/dd HH:mm:ss. Defaults to today if empty |
| started_at | Date Story was started | Format: yyyy/MM/dd HH:mm:ss. No future dates |
| is_completed | Story completion status | Boolean: TRUE or FALSE |
| completed_at | Date Story was completed | Format: yyyy/MM/dd HH:mm:ss. No future dates |
| due_date | Story due date | Format: yyyy/MM/dd HH:mm:ss. Past and future dates allowed |
| epic | Epic name for the Story | Creates new Epic (does not map to existing) |
| epic_created_at | Date Epic was created | Format: yyyy/MM/dd HH:mm:ss. No future dates |
| tasks | To-do items for the Story | Format: [X] task 1;[ ] task 2 (X = completed) |
The CSV import does not support Custom Fields, Teams, Objectives, or Iterations. However, these may be assigned post-import by bulk editing imported Stories.
Example Template
Click the image to enlarge
Send your completed CSV file back to Support, and we will start the import process for you.
Mapping Stories & Users During Import
Once Support uploads the CSV file, you will be notified that the imported data is ready to be mapped via a notification in the bottom right corner of Shortcut.
Map to Existing Workflow and Workflow States
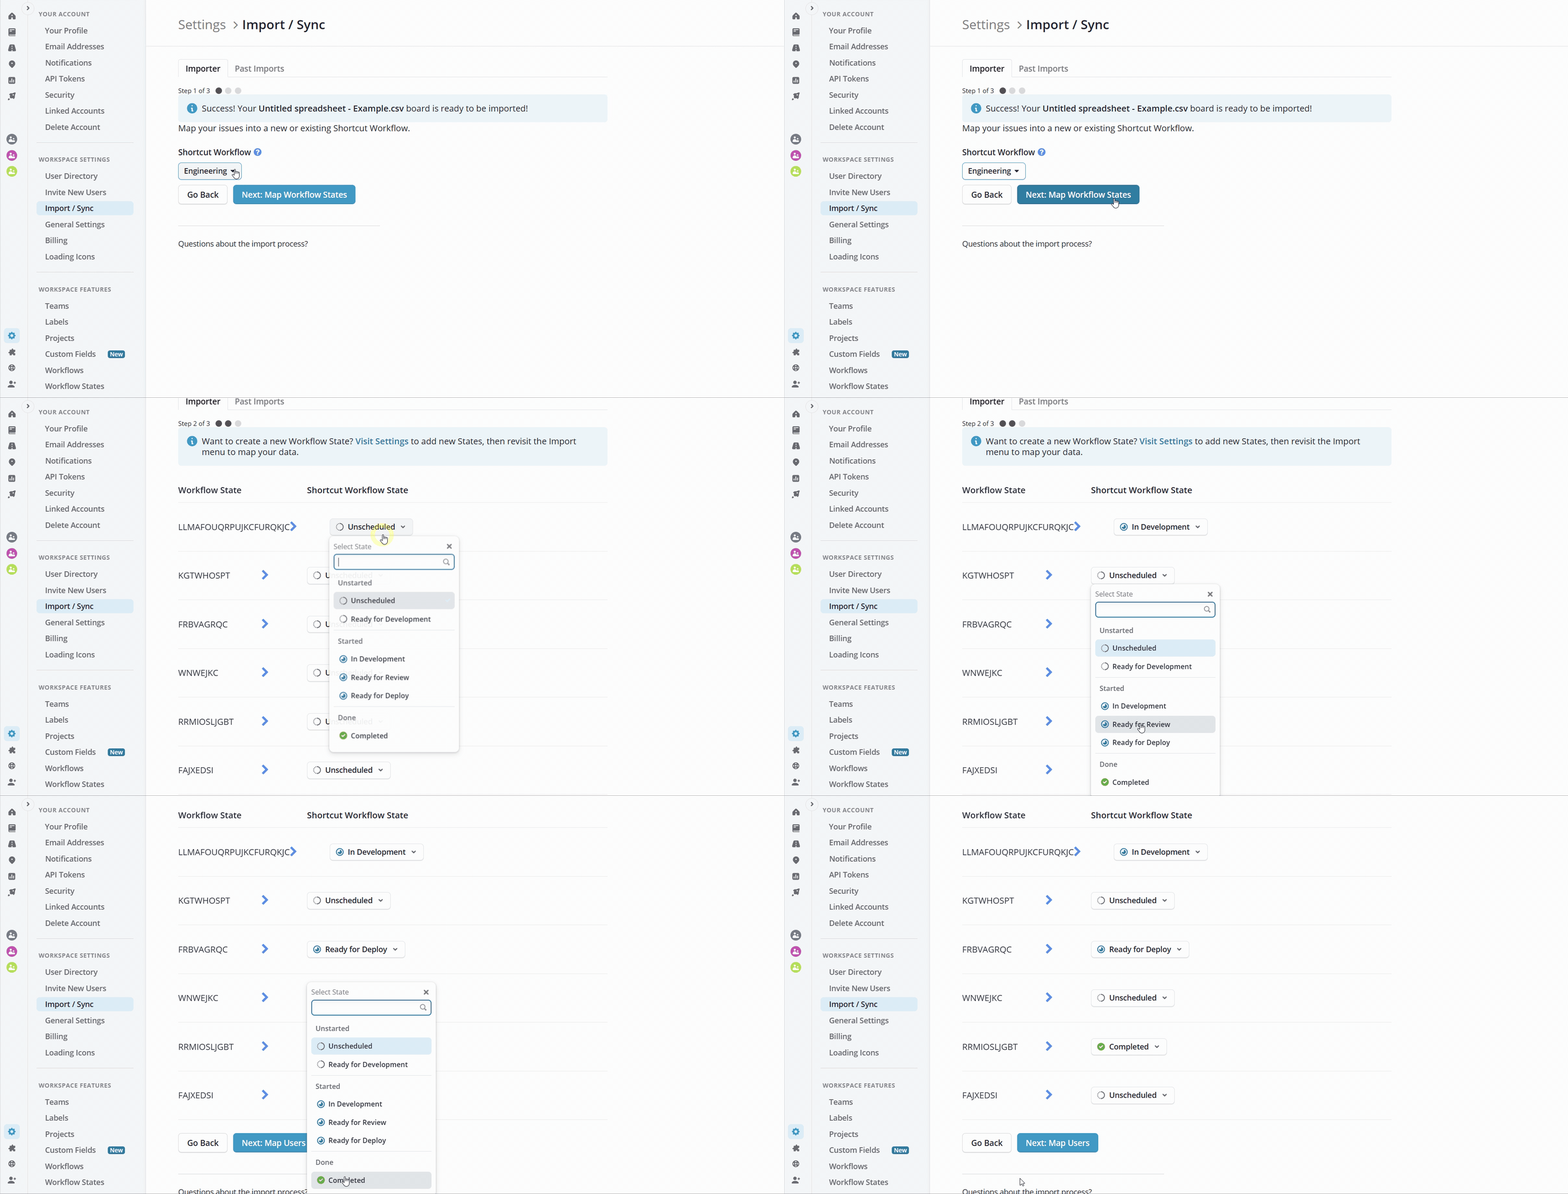
You can import Stories to a single Workflow at a time. We recommend importing all Stories into a Workflow and then bulk-editing them into their correct Workflow/Workflow State afterward.
If you have a large number of Stories that would make bulk editing unrealistic, we recommend sending Support a separate CSV file to import Stories into different Workflows separately.
Map Imported Users to Existing Shortcut Users
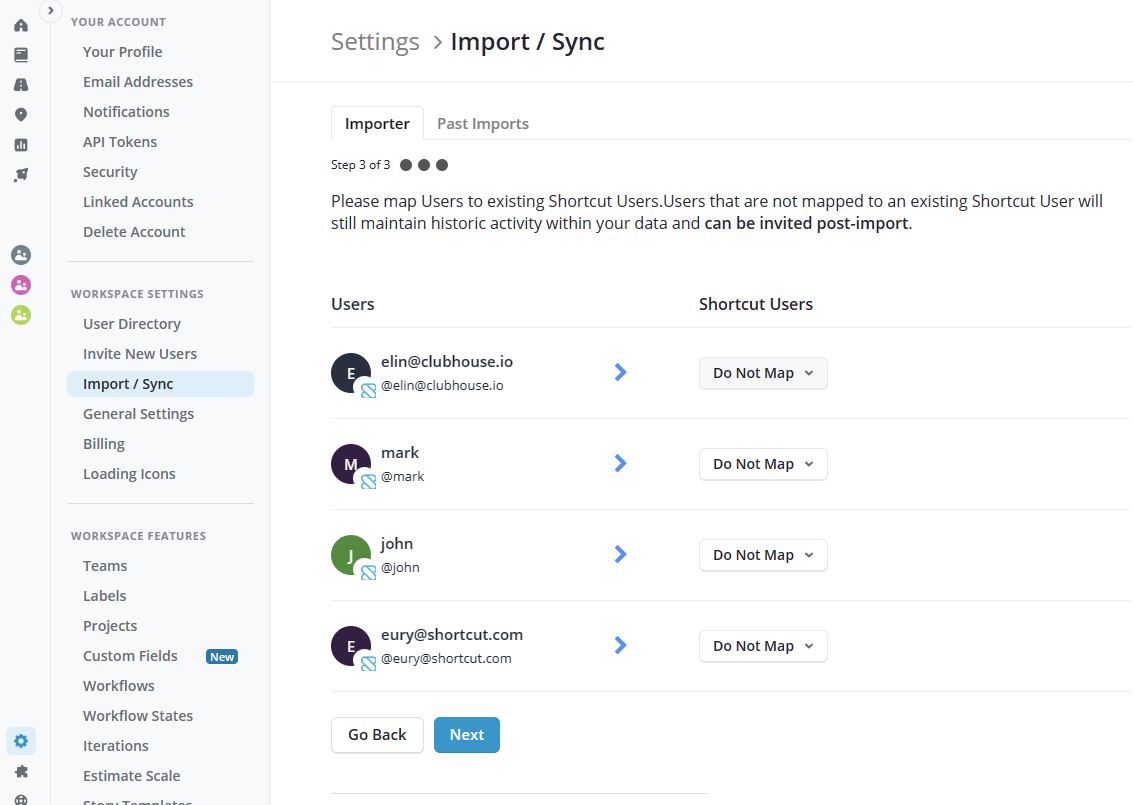
The last step is to map the users you added to the requester or owner fields to existing Shortcut users.
If the user does not yet exist in Shortcut, first invite them via Settings > Invite New Users. Then navigate back to Settings > Import / Sync > Past Import tab to map the users.
Success!
Once the import has been completed, your data is now in Shortcut! We recommend bulk editing the Stories to move them and assign new Fields, Owners, etc. accordingly.