Overview
User management can be performed from two places in Shortcut:
- The Workspace User Directory — manage users at the Workspace level
- The Manage Organization and Workspaces Page — manage users across the entire Organization
The Workspace User Directory
If you’re an Owner or Admin and wish to change someone’s role in your Workspace, go to Settings > Workspace Settings > User Directory and use the dropdown next to the person’s name to change their role.
- Adjust a user’s role - Use the dropdown to the right of their name
- Disable a user - Click the disable (“no entry”) icon next to their role
- Re-enable a user - Go to the Disabled Users tab and click the restore icon next to their role
Things to Note:
- Free plan accounts only have access to Admin roles. Member and Observer roles require a paid plan.
- The User Directory is for managing users at the Workspace level.
- A disabled user will appear here even if they’ve been removed from the Organization by the Owner.
- Only Owners can adjust other Owners and remove users entirely from an Organization.
If you try to re-enable a user who’s been removed from the Organization by an Owner, an Owner will need to re-enable them from the Manage Organization and Workspaces Page, and the user will need to be re-invited to the Workspace.
The Manage Organization and Workspaces Page
If you are an Owner or Admin of an Organization, this page allows you to view and manage user membership and user roles across the entire Organization and all Workspaces.
Only an Owner can manage another user’s Owner status and permissions in a Workspace.
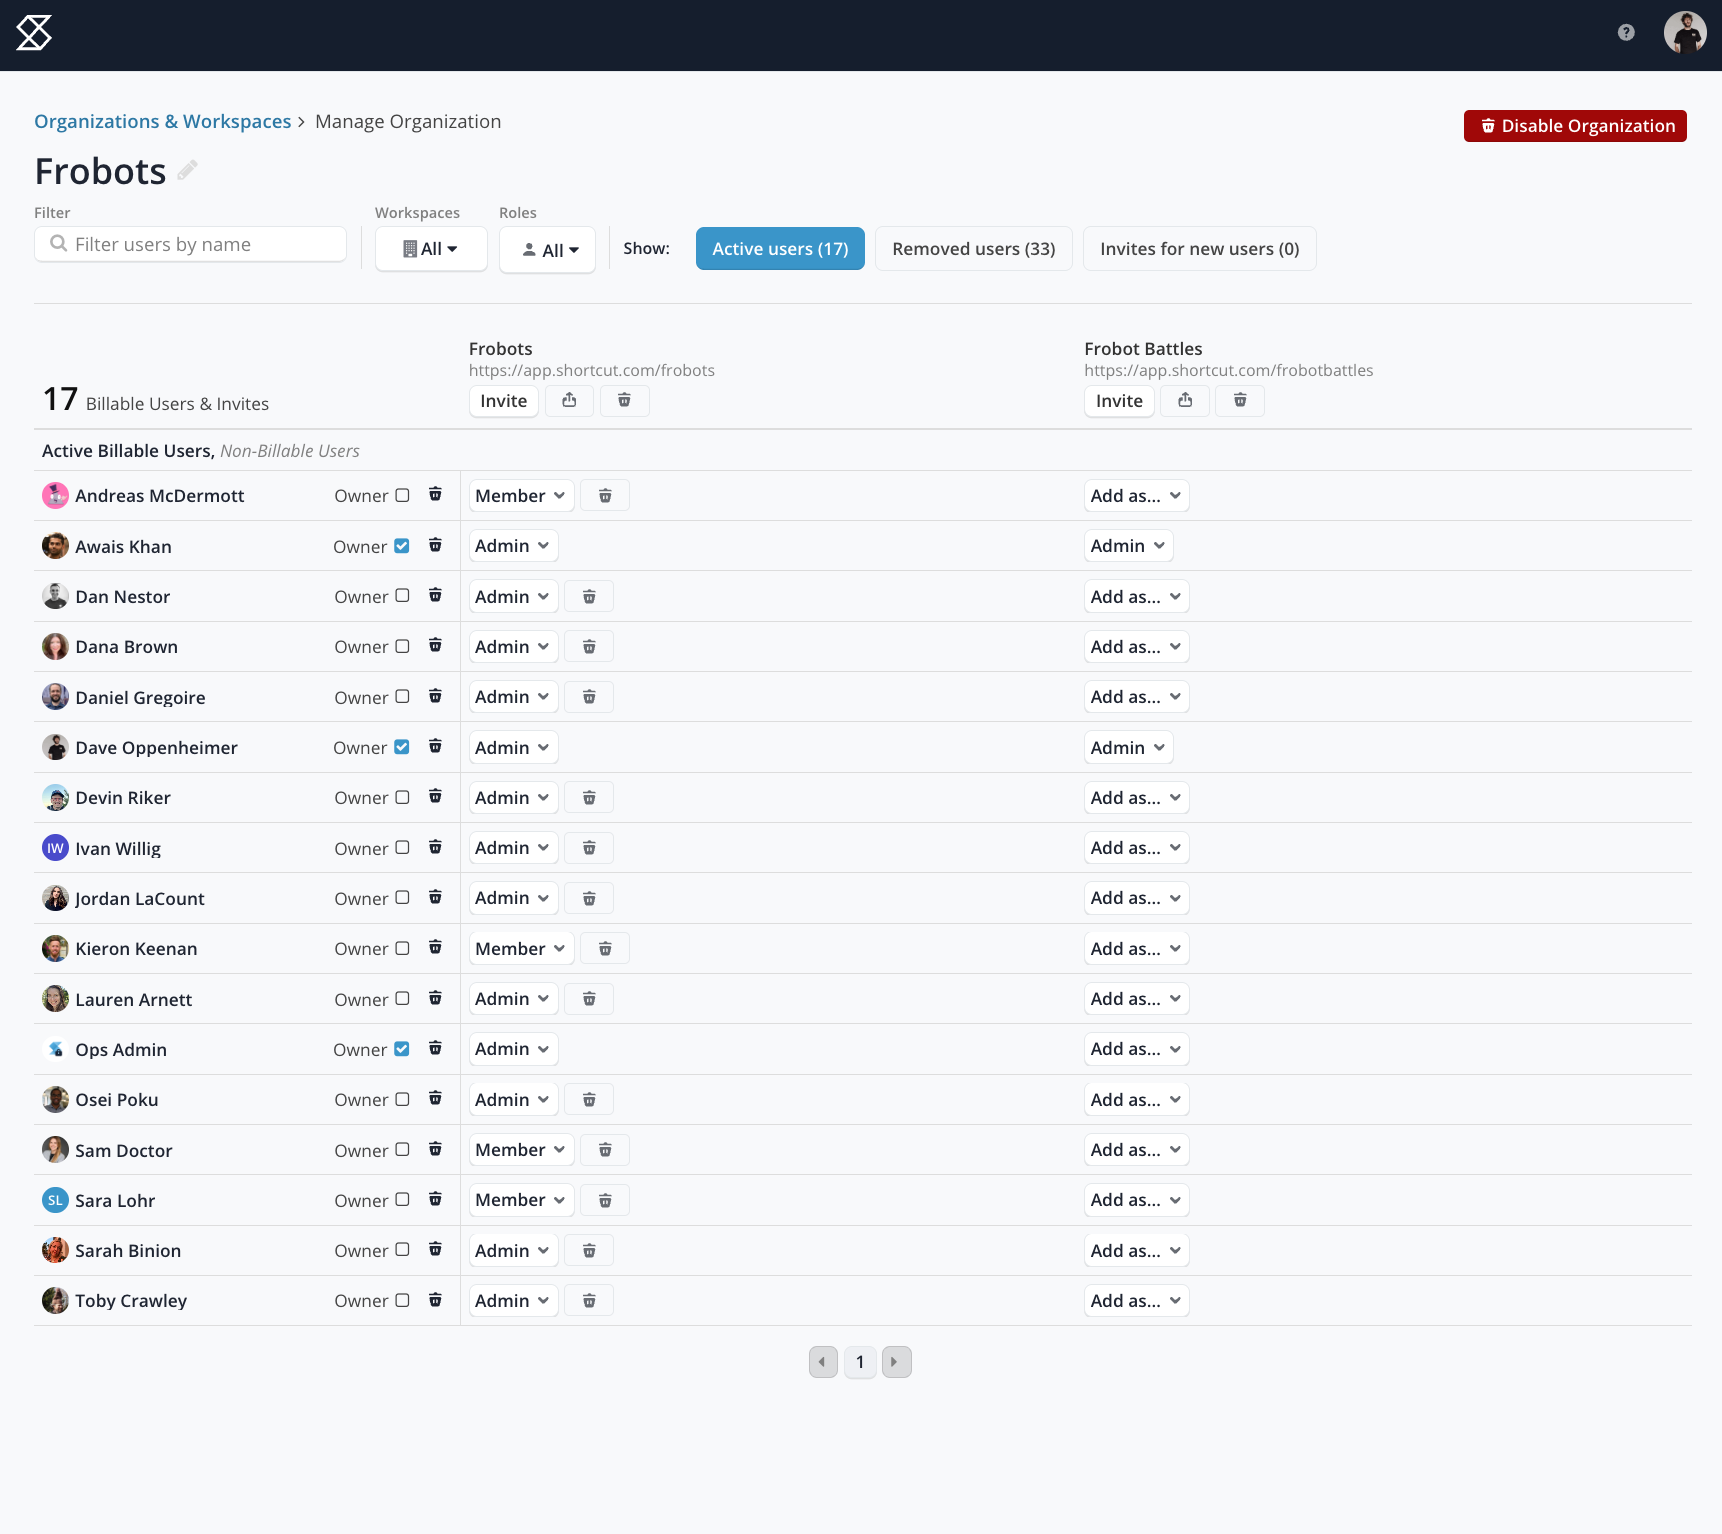
Add an Existing User to Another Workspace
- Find the user’s row in the table
- Click Add as… to get a dropdown menu under the Workspace you’d like to add the user to
- Choose their user role for that Workspace
Users can be associated with one Workspace, all Workspaces, or any combination. A user can also have different roles in different Workspaces.
Change a User’s Role in a Workspace
- Find the user’s row in the table
- Click the role (Owner, Admin, or Member) dropdown menu under the desired Workspace
- Choose a different role
Adjust Owner Status
This action can only be performed by another Organization Owner.
- Find the user in the list or via Search
- Toggle Owner status on or off for that user
- Ensure their user role is changed to reflect the permissions needed in each Workspace
Remove a User’s Permission in a Workspace
- Find the user’s row in the table
- Click the trashcan icon (Disable user in this workspace) next to their role
- Their user role will turn grey and say Disabled
Re-enable a User’s Permissions in a Workspace
- Find the user’s row in the table
- Click the Enable button under the desired Workspace
Removing Users from Your Organization
This action can only be performed by an Organization Owner.
A user can only be removed from an entire Organization after they have been disabled in every Workspace.
- Disable the user in every Workspace using the trashcan icon next to their user role
- Click the trashcan icon next to their name
- Confirm the action
To remove another Owner from your Organization:
- First toggle Owner status off for that user
- Disable their user permissions in all Workspaces
- Select the trashcan icon next to their name to remove them from the Organization entirely
Re-enable Users Who’ve Been Removed
Only an Organization Owner can re-enable a removed user.
- Select the Removed Users option to view all removed users
- Find the user you’d like to re-enable in the table
- Click the restore icon next to their name
- You’ll see a confirmation that the user profile has been re-enabled
Inviting New Users
To invite new users from the Manage Organization and Workspaces Page:
- Click the Invite button next to the Workspace name
- Enter the email address(es) and choose the desired user role
- Click Send Invitations
Transferring Ownership
If the current Owner is available:
- Go to the Manage Organization and Workspaces Page (click on your company’s logo in the upper left corner, then View All Workspaces > Manage Organization and Workspaces)
- Find the user’s row in the table and click the role dropdown menu under the desired Workspace, then choose Owner
- You’ll be asked to confirm: “Are you sure you want to promote [User] to the role of owner? They will become an owner of every Workspace within this Organization.”
- Click OK to confirm
If the current Owner is no longer available:
If the current Owner is no longer with your company or unavailable, Shortcut can change ownership of the account for you following a quick security measure. Submit a written request to support@shortcut.com as a PDF, including:
- The account URL
- The name and email address of the previous account owner
- The name and email address of the new account owner
- The last four digits of the credit card number on file
- The billing address of the credit card on file
The request should be a letter on your company letterhead, signed by a manager at your organization. If your company doesn’t have letterhead, include your company’s mailing address and phone number.
The request must be a PDF sent from an email address in the company’s domain to support@shortcut.com.